Manage settings in Adyen
The following procedures contain information on the settings to be configured in the Adyen™ backend. It shows the standard procedures and screens that were current at the time this documentation was created. For the latest detailed descriptions, refer to the Adyen™ documentation.
In addition to the credentials settings in the Adyen™ backend, the same data is required in the Payments module to ensure a smooth data transfer. Note that once you have saved the credentials in Adyen™ or the Payments module, you can no longer copy them in order to specify them on the other side of the connection. Therefore, we recommend that you enter the connection data in parallel, which means alternately in the Payments module and in the Adyen™ backend. Alternatively, you can cache the credentials in a file. For detailed information on the Payments settings, see also Configure Adyen connection.
Note the following:
- Adyen™ offers the possibility to work with two separate environments, a staging environment for testing purposes and a live environment for production. You must configure the connection for each environment separately.
- If you have more than one merchant account in Adyen™ that you want to manage with Actindo, you must create connections for each.
Additional information
Adyen™ uses TLS certificates, which are changed from time to time. Adyen™ users are informed about this. You can ignore this information from Adyen because Actindo only checks if the certificates are valid in general and does not validate specific certificates. The best practice is not to use certificate pinning (which stores information about the specific certificate that is used by Adyen in order to validate it), but to check the validity of the certificate in general. See also an update example from Adyen™: TLS Certificates on Adyen services.
Create Adyen webhook
Create a webhook to receive payment notifications from Adyen™ to the Payments module such as authorizations and cancellations. For detailed information, see also Webhooks in the Adyen™ documentation. It includes a video that may be helpful, too.
Prerequisites
- You have an Adyen™ customer account to log in to Adyen™.
- You are logged in to Adyen™.
- You are assigned to the required user roles in Adyen™.
- The Adyen plugin is installed on the Actindo Core1 Platform system.
- At least one Adyen™ connection has been created in the Payments module, see Create Adyen connection.
- You are logged in to your Actindo instance under Payments > Settings > Select connection > Credentials tab.
Procedure
Adyen™ > Developers > Webhooks

-
Click the [+ Webhook] button.
The Create new webhook window is displayed.- Select the [Add] button at the Standard webhook entry in the Recommended webhooks section.
The settings for the standard webhook are displayed.

- Select the [Add] button at the Standard webhook entry in the Recommended webhooks section.
-
Enter the following settings in the General section.
- Description
Enter a description for the webhook. -
Server configuration section
-
URL
Enter the server URL of the Actindo production system or sandbox you want to connect.
For example:https://customeraccount.dev.actindo.com/Actindo.Extensions.Actindo.Adyen.Notification.notificationAsync. This example displays the server URL for asynchronous processing. For detailed information on synchronous processing, see Define synchronous or asynchronous processing. - Method
Use the JSON standard setting.
-
Accept webhook
Adyen™ requires you to acknowledge every webhook event with a successful HTTP response status code, for example 200. You can use the standard setting. For detailed information, see Accept webhooks in the Adyen™ documentation. -
Encryption protocol
Use the TLSv1.3 standard setting. -
Version
Displays the version number. .
.
-
- Description
-
Click the [Apply] button and proceed with the following fields in the General section.
- Merchant accounts
Enter the merchant account(s) you want to connect. -
Events
Select all the events whose messages you want to transfer to the Payments module. Actindo accepts all events, although some are not processed because they do not relate to any of the functions Actindo uses for processing. You can exclude an event if you want to process specific events by another third-party application, for example. Alternatively, you can define the events to be ignored in the Payments module settings, see Configure Adyen connection.
- Merchant accounts
-
Click the [Apply] button and enter the following settings in the Security section.
-
Basic authentication
-
Define a username and password for the notification user, so that you can get notifications from Adyen™. You can freely define them.

-
Change to your Actindo instance and enter the username and password in the Notification user and Notification password fields in the Payments settings.

- Change back to Adyen™ and click the [Apply] button.
-
- HMAC key
You can ignore this setting. It is currently not supported by the Payments module.
-
-
Enter the following setting in the Additional settings section. You can ignore the others.
-
3D Secure
Select all entries and click the [Apply] button.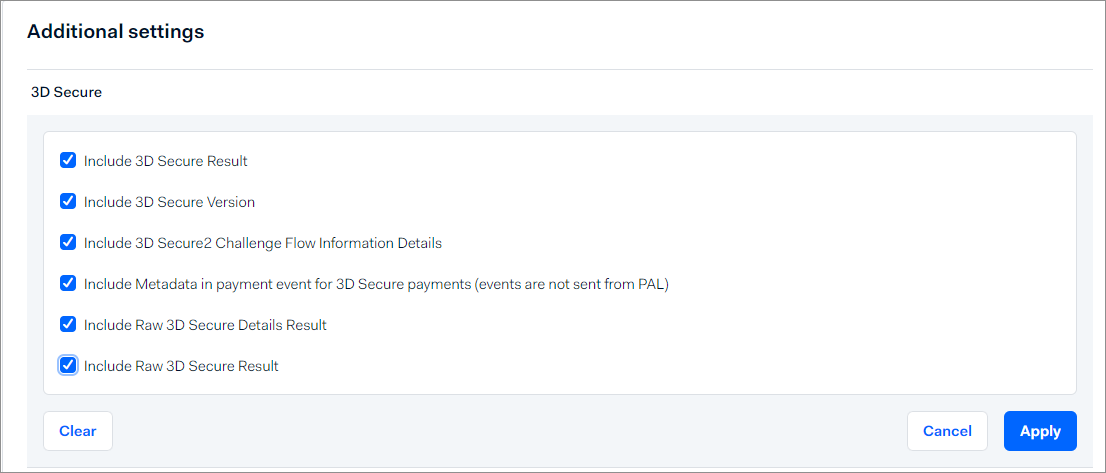
-
-
Click the [Save changes] button in the bottom right corner.
-
Enable the standard webhook.
<[Info] You can test the configuration after you have defined all settings in both Actindo and Adyen™, such as the API users, see Manage Adyen connections.
Define synchronous or asynchronous processing
Define whether you want to transfer the payment data using synchronous or asynchronous processing.
- With synchronous processing, Adyen™ creates a connection for every event that occurs. This has the advantage that Adyen™ is immediately informed if a message cannot be processed, which you may want, if someone monitors these errors. The disadvantage is that any processing error is immediately returned to Adyen. This results in an error that can block the queue. In addition, the message processing is slower because parallel processing is not possible. See also Blocked queue at synchronous processing in the Troubleshooting chapter.
- With asynchronous processing, Actindo accepts any message with a valid format and writes it to a message queue. Errors are not returned to Adyen, but are logged in the Actindo log. The message queue is processed periodically and can be run with parallel jobs.
Prerequisites
- You have an Adyen™ customer account to log in to Adyen™.
- You are logged in to Adyen™.
- You are assigned to the required user roles in Adyen™.
Procedure
Adyen™ Backend > Developers > Webhooks
-
Click on your standard webhook.
-
Expand the Server configuration setting in the General section.
 .
. -
Configure the server URL as follows:
-
If you want to process the messages asynchronously, add an Async to the address. For example:
https://customeraccount.dev.actindo.com/Actindo.Extensions.Actindo.Adyen.Notification.notificationAsync. - If you want to process the messages synchronously, add a 2 to the address. For example:
https://customeraccount.actindo.com/Actindo.Extensions.Actindo.Adyen.Notification.notification2.
-
-
Click the [Apply] button.
The synchronous or asynchronous processing has been defined. - Click the [Save changes] button in the bottom right corner.
Create web service API credentials
Create the web service API credentials to send messages from the Payments module to the Adyen™ backend. For detailed information, see API credentials in the Adyen™ documentation.
You must generate a web service API key for both the test environment and the live environment in Adyen. In Actindo, you need to redo the procedure in the productive instance, if you switch to a live environment in Adyen.
Prerequisites
- You have a valid user account in Adyen™.
- You are assigned to the required user roles in Adyen™.
- You are currently creating a connection in the Payments module, see Create Adyen connection.
- The Adyen plugin is installed on the Actindo Core1 Platform system.
- You are logged in to your Actindo instance under Payments > Settings > Select connection > Credentials tab. For detailed information, see Configure Adyen connection.
Procedure
Adyen™ Backend > Developers > API credentials

-
Click the Create new credential button.
The Create API credential window is displayed. The Web service user credential type is selected by default. The username has been created automatically by the system.
-
Copy the username.
-
Change to your Actindo instance. Enter the username in the Payment user field.

-
Return to your Adyen™ account and enter a description for the web service user in the Description field.
-
Click the [Create credential] button.
The Configure API credential view is displayed. The API key tab is displayed by default. -
Generate the Web service API key and enter it in Actindo. To do this, follow these steps:
-
Click the API key tab in the Server settings > Authentication section.
-
Click the [Generate API key] button, if you want to generate a new key.
The API key is automatically generated.
-
Click the Copy API key button.
-
Change to your Actindo instance and insert the API key in the Checkout API key field.

-
-
Return to your Adyen™ account and generate the Web service API password and enter it in Actindo. To do this, follow these steps:
-
Click the Basic auth tab and click the [Generate password] button, if you want to generate a new password.
The password is automatically created.
-
Click the Copy password button.
-
Change to your Actindo instance and insert the password in the Payment password field.

-
-
Return to Adyen™ and click the [Save changes] button in the bottom right corner.
The credentials for the Web service API are applied. -
If necessary, configure your wallet payment methods in the Wallet payment methods section. Refer to the Adyen™ documentation.
- If necessary, assign roles to define the permissions of the API credentials in the Permissions > Roles section. For detailed information, see API permissions in the Adyen™ documentation.
Create report service API credentials
Create the report service API credentials to receive the daily report from Adyen™. It collects all events of the day in a CSV file and sends it to Actindo. The Payments module then automatically checks if all these events have been successfully transferred (reconciliation).
For detailed information, see API credentials in the Adyen™ documentation.
You must generate a report service API key for both the test environment and the live environment.
Prerequisites
- You have an Adyen™ customer account to log in to Adyen™.
- You are logged in to Adyen™.
- You are assigned to the required user roles in Adyen™.
- The Adyen plugin is installed on the Actindo Core1 Platform system.
- At least one connection has been created in the Payments module, see Create Adyen connection.
- You are logged in to your Actindo instance under Payments > Settings > Select connection > Credentials tab.
Procedure
Adyen™ Backend > Developers > API credentials
-
Click the Create new credential button.
The Create API credential window is displayed. The Web service user credential type is displayed by default. -
Select the Report service user credential type.
The username is automatically created by the system.
-
Copy the username.
-
Change to your Actindo instance and paste the report username in the Report user field.

-
Return to your Adyen™ account and enter a description for the report service user in the Description field.
-
Click the [Create credential] button.
The Configure API credential view is displayed. The API key tab is displayed by default. -
Generate the Report service API key and password. To do this, follow these steps:
-
Click the API key tab in the Server settings > Authentication section.
-
Click the [Generate API key] button, if you want to generate a new key.
The API key is automatically applied.You do not need to enter the report API key in your Payments connection settings. For the Payments module, the report name and password are sufficient.
-
Click the Basic auth tab in the Server settings > Authentication section.
-
Click the [Generate password] button, if you want to generate a new password.
The password is automatically created. - Click the Copy password button.
-
-
Change to your Actindo instance and insert the password in the Report password field.

-
Return to your Adyen™ account and click the [Save changes] button in the bottom right corner.
The credentials for the Report service API are applied. - If necessary, assign the required report role to allow the technical user to download reports in the Permissions > Roles > REPORT section. For detailed information, see API permissions in the Adyen™ documentation.